Loading
Showing posts with label Java Programe. Show all posts

Friday, April 1, 2011

The NetBeans Software


When you first run NetBeans, you'll see a screen something like this one:
You may have to drum your fingers and wait a while, as it's not the fastest thing in the world.
To start a new project, click on File > New Project from the NetBeans menu at the top. You'll see the following dialogue box appear:
The New Project Dialogue Box
We're going to be create a Java Application, so select Java under Categories, and then Java Application under Projects. Click the Next button at the bottom to go to step two:
NetBean's New Project Wizard - Step Two
In the Project Name area at the top, type a Name for your Project. Notice how the text at the bottom changes to match your project name (in the text box to the right of Create Main Class):
firstproject.Main
If we leave it like that, the Class will have the name Main. Change it to FirstProject:
Create Main Class
Now, the Class created will be called FirstProject, with a capital "F", capital "P". The package is also called firstproject, but with a lowercase "f" and lowercase "j".
The default location to save your projects appears in the Project Location text box. You can change this, if you prefer. NetBeans will also create a folder with your project name, in the same location. Click the Finish button and NetBeans will go to work creating all the necessary files for you.
When NetBeans returns you to the IDE, have a look at the Projects area in the top left of the screen (if you can't see this, click Window > Projects from the menu bar at the top of the software):
Projects Area in NetBeans
Click the plus symbol to expand your project, and you'll see the following:
Folders in the Project
Now expand Source Packages to see your project name again. Expand this and you'll see the Java file that is your source code.
The Java Source File
This same source code should be displayed to the right, in the large text area. It will be called FirstProject.java. If you can't see a code window, simply double click FirstProject.java in your Projects window above. The code will appear, ready for you to start work.
The coding window that appears should look like this (we've changed the author's name):
The Java coding window
One thing to note here is that the class is called FirstProject:
public class FirstProject {
This is the same name as the java source file in the project window: FirstProject.java. When you run your programmes, the compiler demands that the source file and the class name match. So if your .java file is called firstProject but the class is called FirstProject then you'll get an error on compile. And all because the first one is lowercase "f" and the second one uppercase.
Note that although we've also called the package firsproject, this is not necessary. We could have called the package someprogramme. So the name of the package doesn't have to be the same as the java source file, or the class in the source file: it's just the name of the java source file and the name of the class that must match.
In the next part, you'll learn about Java comments.

Java Comments


When you create a New Project in NetBeans, you'll notice that some text is greyed out, with lots of slashes and asterisks:
The Java coding window
The greyed-out areas are comments. When the programme runs, comments are ignored. So you can type whatever you want inside of your comments. But it's usual to have comments that explain what is you're trying to do. You can have a single line comment by typing two slashes, followed by your comment:
//This is a single line comment
If you want to have more than one line, you can either do this:
//This is a comment spreading
//
over two lines or more
Or you can do this:
/*This is a comment spreading
over two lines or more
*/
In the comment above, note how it starts with /*. To end the comment, we have */ instead.
There's also something called a Javadoc comment. You can see two of these in the coding image on the previous page. A Javadoc comment starts with a single forward slash and two asterisks ( /** ) and ends with an asterisk and one slash ( */ ). Each line of the comment starts with one asterisk:
/**
*
This is a Javadoc comment 
*/
Javadoc comments are used to document code. The documented code can then be turned into an HTML page that will be helpful to others. You can see what these look like by clicking Run from the menu at the top of NetBeans. From the Run menu, select Generate Javadoc. There's not much to see, however, as you haven't written any code yet!
At this stage of your programming career, you can delete the comments that NetBeans generates for you. Here's our code again with the comments deleted:
Coding Window - Java Comments Deleted
In the next part, you'll learn about the structure of the above code, and how to run your programmes.

The Structure of Java Code


In the previous section, you tidied up your code a bit. Here's what your coding window should look like now:
First Java Project Code
You can see we have the package name first. Notice how the line ends with a semicolon. If you miss the semicolon out, the programme won't compile:
package firstproject;
The class name comes next:
public class FirstProject {
}
You can think of a class as a code segment. But you have to tell Java where code segments start and end. You do this with curly brackets. The start of a code segment is done with a left curly bracket { and is ended with a right curly bracket }. Anything inside of the left and right curly brackets belong to that code segment.
What's inside of the left and right curly brackets for the class is another code segment. This one:
public static void main( String[ ] args ) {

}
The word "main" is the important part here. Whenever a Java programme starts, it looks for a method called main. (A method is just a chunk of code. You'll learn more about these later.) It then executes any code within the curly brackets for main. You'll get error messages if you don't have a main method in your Java programmes. But as its name suggest, it is the main entry point for your programmes.
The blue parts before the word "main" can be ignored for now.
(If you're curious, however, public means that the method can be seen outside of this class; static means that you don't have to create a new object; and void means it doesn't return a value - it just gets on with it. The parts between the round brackets of main are something called command line arguments. Don't worry if you don't understand any of that, though.)
The important point to remember is that we have a class called FirstProject. This class contains a method called main. The two have their own sets of curly brackets. But the main chunk of code belongs to the class FirstProject.
In the next part, you'll learn how to run your Java programmes.

Sharing your Java Programmes


You can send your programmes to other people so that they can run them. To do that, you need to create a JAR file (Java Archive). NetBeans can do all this for you. From theRun menu at the top, select Clean and Build Main Project.
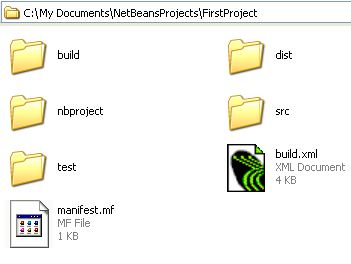
When you do, NetBeans saves your work and then creates all the necessary files. It will create a folder called dist and place all the files in there. Have a look in the place where your NetBeans projects are and you'll see the dist folder:
The Java dist folder
Double click the dist folder to see what's inside of it:
A Java Archive file - JAR
You should see a JAR file and README text file. The text file contains instructions on how to run the programme from a terminal/console window.
Now that you know how to run your java source files, let's do some programming.

How to Run Your Java Program


When you run a programme in NetBeans, it will run in the Output window at the bottom of your screen, just underneath your code. This is so that you don't have to start a terminal or console window - the Output window IS the console.
There are various ways to run your programme in NetBeans. The easiest way is to press F6 on your Keyboard. You can also run programmes using the menus as the top of NetBeans. Locate the Run menu, then select Run Main Programme:
The Run Menu in NetBeans
You can also click the green arrow on the NetBeans toolbar:
The Run icon on the toolbar
Another way to run your programmes is from the Projects window. This will ensure that the right source code is being run. Simply right click your java source file in the projects window and you'll see a menu appear. Select Run File.
Running the programme from the Projects window
Using one of the above methods, run your programme. You should see something happening in the Output window:
The Java Output window
The second line in the Output window above is our code: My First Project. You can quickly run it again by clicking the two green arrows in the top left of the Output window.

Printing to the Output Window


You can run the code you have so far, and turn it into a programme. It doesn't do anything, but it will still compile. So let's add one line of code just so that we can see how it works.
We'll output some text to a console window. Add the following line to your main method:
public static void main( String[ ] args ) {
System.out.println( "My First Project" );
}
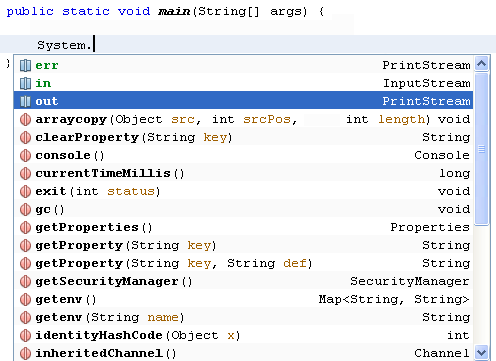
When you type the full stop after "System", NetBeans will try to help you by displaying a list of available options:
The Java System Options
Double click out to add it to your code, then type another full stop. Again, the list of options appears:
The Java Output Options
Select println( ). What this does is to print a line of text to the output screen. But you need to place your text between the round brackets of println. Your text needs to go between a pair of double quotes:
Println double quotes
Once you have your double quotes in place, type your text:
Text added in double quotes
Notice that the line ends in a semicolon. Each complete line of code in Java needs a semicolon at the end. Miss it out and the programme won't compile.
OK, we can now go ahead and test this programme out. First, though, save your work. You can click File > Save, or File > Save All. Or click the Save icon on the NetBeans toolbar.
To end this section, click below to learn how to share your Java programmes with others.

Sponsor Link

Popular Posts

Sponsor Link